3.31.2008

black-bottom cupcakes

I found both this recipe and the cheesecake recipe below at the same time, and I couldn't resist making them together-- they're like inverses of each other! I called them secret agent desserts because they'd infiltrated one another--cake (okay, brownie) hiding in the cheesecake, and cheesecake sneakily nestled in the middle of each cupcake.

black bottom cupcakes

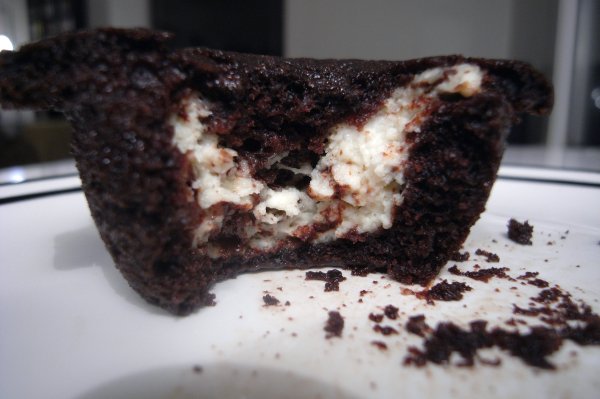
When smitten kitchen made these, she (and several commenters) had a hard time keeping the filling in the middle. I used an ice-cream scoop that held about two tablespoons and put two scoops of cupcake batter, then two of filling, and then another one and a half of batter, making sure that no filling was peeking out of the top, and that seemed to work just fine.

cupcakes, unbaked

I would suggest using liners for these, as I didn't and they were a bit tricky to get out of the tray. They didn't puff up too much, but they were moist and crumby and amazing.

Black-Bottom Cupcakes
The Great Book of Chocolate, David Lebovitz

Yield: 12 cupcakes

Filling:
8 ounces cream cheese (room temperature)
1/3 cup granulated sugar
1 large egg (room temperature)
2 ounces bittersweet or semisweet chocolate, coarsely chopped

Cupcakes:
1 1/2 cups all-purpose flour
1 cup firmly packed light brown sugar
5 tablespoons natural unsweetened cocoa powder (not Dutch-process)
1 teaspoon baking soda
1/4 teaspoon salt
1 cup water
1/3 cup vegetable oil (canola, not olive)
1 tablespoon white or cider vinegar
1 teaspoon vanilla extract

Make the filling: Beat together the cream cheese, granulated sugar, and egg until smooth. Stir in the chopped chocolate pieces. Set aside.

Assemble:

1. Adjust the rack to the center of the oven and preheat to 350°F. Butter/spray a 12-cup muffin tin, or line the tin with paper muffin cups.

2. In a medium bowl sift together the flour, brown sugar, cocoa powder, baking soda, and salt. In a separate bowl, mix together the water, oil, vinegar, and vanilla.

3. Make a well in the center of the dry ingredients and stir in the wet ingredients, stirring until just smooth. Stir any longer and you will over mix the batter and end up with less-than-tender cupcakes.

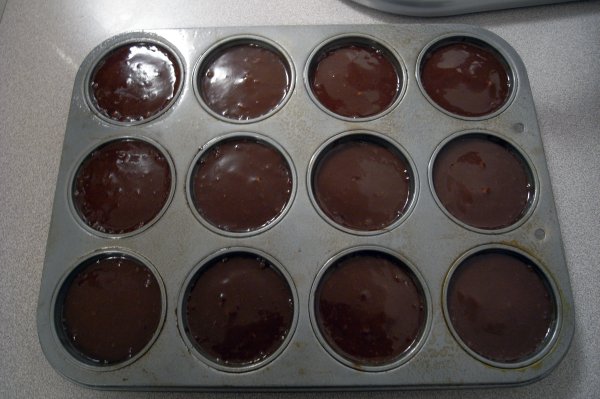
4. Divide the batter among the muffin cups. Spoon a few tablespoons (2-4) of the filling into the center of each cupcake, dividing the filling evenly. (If you do it this way, the cupcakes will have a marbled look on top, or be cheesecake-topped. If you want surprise filling, save some cupcake batter to put over the filling, making sure that no filling peeks out.

5. Bake for 25 minutes, or until the tops are slightly golden brown (if they're cheesecake-topped) and the cupcakes feel springy when gently pressed. These keep well unrefrigerated for 2 to 3 days if stored in an airtight container. I thought about buying one of those cupcake-transporters (finally, a way to justify it!) but we, um, ate them all before I could get to the store.

3.29.2008

brownie mosaic cheesecake

I stole this adaptation from Smitten Kitchen, but I adapted it further, using a different (and easier) ganache than she did. I'm not a huge fan of very sweet things, but this cheesecake was devoured at the potluck.

This recipe has many parts: you make the brownies, the crust, the cheesecake and the ganache, but every part is easy on its own, and people will be so impressed that they'll tell you to open up a bakery, graduate school be damned.

brownie bits

Phase I: Brownies
Adapted from Baker’s One Bowl Brownies

4 ounces unsweetened chocolate (I <3 scharffen berger for, well, anything)
3/4 cup (1 1/2 sticks) butter
1 3/4cups sugar
3 eggs
1 teaspoon vanilla
1/2 teaspoon salt
1 cup flour

Preheat oven to 350°F. Line 13×9-inch baking pan with foil, with ends of foil extending over sides of pan. Grease foil.

Microwave chocolate and butter in large microwaveable bowl on HIGH in 30-second increments until butter is melted. Stir until chocolate is completely melted. Stir in sugar. Blend in eggs and vanilla. Add flour and salt; mix well. Spread into prepared pan. The batter may look precariously thin over the 9x13 pan; don't worry.

Bake 30 to 35 minute or until toothpick inserted in center comes out with fudgy crumbs. (Do not overbake.) Cool in pan on wire rack. Remove brownies from pan, using foil handles. When I did this, 30 minutes was overbaked. But no one noticed or cared. Check yours at 20 or 25 minutes.

Cool brownies, then cut them into 3/4- to 1-inch squares for use in the cheesecake. You need 2 cups of cubes for the cheesecake, and you will have at least twice that. Save some to pulse in the food processor for decorative topping; the rest make an excellent snack while you're waiting the interminable million hours for the cheesecake to chill to done-ness.

brownies in cheesecake

Phase II: Crust
Recipe adapted from Gourmet, 1999

I'm with smitten kitchen here-- I used the doubled amounts in parentheses. Who doesn't like extra crust? It also makes patting the sides and bottom of the pan easier, as you're not worried about running out of crust because you've made the sides too thick. That's, um, never happened to me.

1 1/2 cups or 5 ounces (3 cups or 10 ounces to double) finely ground cookies such as chocolate wafers. Or Chocolate Teddy Grahams. (I use the teddies. A bit cheaper.)
5 tablespoons (10 tablespoons to double) unsalted butter, melted
1/3 cup (2/3 cup to double) sugar
1/8 (1/4 teaspoon to double) teaspoon salt

Stir together crust ingredients and press onto bottom and 1 inch up side of a buttered 24-centimeter (~9.5") springform pan. Fill right away or chill up to 2 hours.

cheesecake closeup

Phase III: The Cheesecake
Part Three: Cheesecake
Three Cities of Spain Coffeehouse

3 (8-oz) packages cream cheese, softened
4 large eggs
1 teaspoon vanilla
1 cup sugar

Make crumb crust as directed above for 24-centimeter cheesecake. Preheat oven to 350°F.

Make filling and bake cake: Beat cream cheese with an electric mixer until fluffy and add eggs, 1 at a time, then vanilla and sugar, beating on low speed until each ingredient is incorporated and scraping down bowl between additions.

Fold brownie cubes in very gently and pour mixture into prepared pan. Put springform pan with crust in a shallow baking pan. Pour filling into crust and bake in baking pan (to catch drips) in middle of oven 45 minutes, or until cake is set 3 inches from edge but center is still slightly wobbly when pan is gently shaken. For me, 45 minutes was too many. 40 would have been also. Check yours at 35.

When completely cool, top with ganache. At this point, I stuck the (non-ganache-d) cheesecake in the fridge and went to bed. I put the ganache on in the morning.

cheesecake baked

As you can see, my slightly over-baked cheesecake isn't very pretty. A water bath would help, but I'm lazy. Ganache cures all top-of-cheesecake related errors, and it's delicious too. Smitten kitchen claims she's lazy, but her ganache recipe involved a food processor and 5 different ingredients. I'll spare you. Mine has two ingredients and requires a bowl and spoon.

Phase IV: Ganache
from Food & Wine, February 2006

4 oz. semisweet chocolate, chopped (1/2 cup)
1/2 cup heavy cream

In a medium glass bowl, combine the chocolate with the heavy cream and microwave at high power in 20-second intervals until the cream is hot and the chocolate is melted. Stir the ganache until blended, then let cool until barely warm.

Spread the chocolate over the cheesecake and chill.

You can stop here, or do what I did, if you like things pretty:

Pulse some of your leftover brownies (unless you ate them all...I had to wrestle mine away from the mister...) in the food processor until crumby. After the ganache-topped cheesecake has chilled for 15 minutes, pull it out and sprinkle the brownie crumbs around the edge of the cheesecake in a band 1-2" wide. Cover and chill overnight.

3.28.2008

busy day cake

I hadn't been able to bake since finals started. Which means that the minute I got a chance, I went on a binge. I was invited to a potluck, and I saw this as the perfect reason to make not one, or two, but THREE desserts. Two for the potluck and one for us to start gnawing on immediately.

kitchen binge

Because I wanted our dessert Right Now, I decided to make my quickest cake. It's easy, fast, and is good for breakfast, snack or dessert (I accidentally wrote "dinner" because sometimes, it's that too). I usually eat it plain but you can also have it with berries or some whipped cream or creme fraiche. I use as much nutmeg as I feel like grating.

busy day cake

This is my gift to you: the easiest, most versatile cake you'll ever make. And because the flavor is so mild, you never get sick of it. Trust me. I've made it almost once a week since I found the recipe. It keeps well and it's great to grab a slice on your way out the door when you're running late for the bus. Not that that ever happens to me.

busy day cake

Edna Lewis' Busy Day Cake. (stolen from Orangette.)

1 stick (8 Tbsp.) unsalted butter, at room temperature
1 1/3 cups granulated sugar
3 large eggs
2 tsp. vanilla extract
2 cups unbleached all-purpose flour
2 ½ - 4 tsp. baking powder (see headnote, above)
¼ tsp. salt
1 good pinch freshly grated nutmeg, or more. LOTS more. and I promise, freshly grated is worth it.
½ cup whole milk, at room temperature

Preheat the oven to 375°F. Grease a 9” springform pan with butter or cooking spray.

In the bowl of a stand mixer, blend the butter and the sugar until light and fluffy. One by one, add the eggs, beating well after each addition. Add the vanilla extract, and beat to blend.

In a medium bowl, whisk together the flour, baking powder, salt, and nutmeg.

Add about ¼ of the flour mixture to the butter mixture, and beat on low speed to incorporate. Add 1/3 of the milk, and beat again. Add the remaining flour mixture in three more doses, alternating each time with a bit of milk, and beating to just combine. Do not overmix. Using a rubber spatula, scrape down the sides of the bowl and stir to incorporate any flour not yet absorbed.

Scrape the batter into the prepared pan, spreading it evenly across the top. Bake for 30 to 35 minutes, or until a toothpick inserted in the center comes out clean. This cake has a tendency to brown quickly on top, so after about 20 minutes, you might want to peek into the oven and tent the cake with aluminum foil if necessary.

Serve warm. Or cool, for breakfast.

busy day cake

3.17.2008

jacked-up banana bread

By "jacked-up," I mean "full of Jack". Or, in my case, Jim. Beam.

banana bread


I stole this recipe from Smitten Kitchen but that's okay because she stole it too. Sort of. And I can see why- it's great. Sometimes (like this time) I add a handful or two of chocolate chips, other times I add chopped pecans or walnuts. And once in a while I make it as is.

Elise’s Friend Heidi’s Friend Mrs. Hockmeyer’s Banana Bread, As Jacked Up by Deb (and then Stolen by lana)
Adapted from Simply Recipes

3 to 4 ripe bananas, smashed (hooray potato masher!)
1/3 cup melted salted butter
3/4 cup light brown sugar (or more, if you must)
1 egg, beaten
1 teaspoon vanilla
1 tablespoon bourbon
1 teaspoon baking soda
Pinch of salt
1 teaspoon cinnamon
1/2 teaspoon nutmeg
Pinch of ground cloves
1 1/2 cup of flour

No need for a mixer for this recipe! Preheat the oven to 350°F. With a wooden spoon, mix butter into the mashed bananas in a large mixing bowl. Mix in the sugar, egg, vanilla and bourbon, then the spices. Sprinkle the baking soda and salt over the mixture and mix in. Add the flour last, mix just enough to combine (don't overmix). Pour mixture into a buttered 4×8 inch loaf pan. Bake for 1 hour. Cool on a rack. Remove from pan and slice to serve.

This makes a great breakfast, especially toasted a bit in the toaster oven. If you've put chocolate in it, that makes the chocolate bits all melty. I sure do love melty.

3.12.2008

lazy chicken breast


I make a version of this whenever I'm lazy but I want comfort food. When I was younger, my parents took me to Outback, where I loved a dish called Alice Springs Chicken. I stopped going to Outback when I got older and discovered non-chain restaurants, but I always had fond memories of that chicken. Once, I went back to find that they'd taken it off the menu.


This summer, I did a 'focus group study' and earned $100 in Amazon money. (Hooray for market research!) I spent it on cast iron pans. One lazy day I covered a chicken breast in kosher flake salt (thanks, Good Eats), pepper, and red pepper flakes and cooked it for 4-6 minutes on each side until it wasn't pink in the middle anymore. It was remarkably good for being so simple.


But of course, I can't leave well enough alone. One day, I craved Alice Springs Chicken. (It is really, truly bizarre how some foods stick with you.) So I made the simple chicken and sauteed some sliced mushrooms in butter and pepper in another pan. I covered the (cooked) chicken with the mushrooms, put a slice of sharp cheddar on top, and stuck the whole thing in the microwave for 30 seconds to melt the cheese. I always had the heeby-jeebies about using the microwave on my food, but I couldn't think of a better way to melt the cheese. Now I've learned the way of the broiler. If you use a cast iron pan you can stick the whole thing under the broiler for a minute and you're done!


You'll notice that there are no mushrooms in the picture I posted. Or cheddar cheese. I confess, today I cheated. I wanted the lazy chicken but I had neither mushrooms nor cheddar. So I cooked the chicken, sliced some cherry tomatoes and found some arugula. I put the chicken on top of the tomatoes, the arugula on top of the chicken, and shredded some gouda on top of that.


Yum.

3.06.2008

arugula-citrus salad


One day at the Metropolitan Market I spent too much money on a magazine called "Cuisine for Two". It had easy recipes in portions for two people instead of four or six or eight. We started cooking out of it, and after we'd make three or four things I realized it was worth every penny of the 9.95 plus tax. Even if I never make any of the pork or beef dishes.

This salad comes from that magazine. It is paired with a vegetable paella that's also good, but really, this salad just blows it away:


Arugula-citrus Salad:
total time: 10 minutes

1 T fresh lemon juice
2 t honey
2 t olive oil
1/2 t shallots, minced (we didn't have these on hand either time and didn't use them)
2 cups arugula leaves
1 orange, peeled and segmented
2 T slivered almonds, toasted (can get these at Trader Joe's)


Whisk together lemon juice, honey, oil, shallots, salt and pepper (to taste) in a bowl. Add arugula, almonds, and oranges. Toss to coat.

The arugula is peppery and the oranges and honey are sweet and the salt just sets everything off perfectly. The almond crunch is a good contrast to the orange segments. I eat the salad at the end of the meal because it feels like dessert. Come summer, I'm going to eat this every day. Justin's made it twice in the last week.

3.05.2008

yay, pudding!


I know that I confessed that I don't like milk chocolate. It's true. My heart belongs to dark chocolate. 62% and up. You know what they say-- once you go black...


Ahem. Anyway. I also love pudding. (And pastry cream, and mousse...) Smitten Kitchen posted an easy pudding recipe that I couldn't resist, especially after Justin gave me two bars of Scharffenberger baking chocolate for Valentine's (does he know me or what?). So I chopped up the chocolate and got to stirrin'.


I was rewarded with delicious pudding. Not too thick, perfectly chocolatey, and gone all too quickly. The only problem I'd had with the pudding was that it was a bit lumpy, because I was too lazy to waste time straining it before I let it chill. So I decided to make it again--and a vanilla version!--and try to eliminate the lumps.


That time, I used a tip from one of Smitten Kitchen's commenters, who said that you could mix the cornstarch up with some milk to make a slurry (put in small tupperware and shake) before adding it to the sugar/milk and that would prevent lumps. I did that, for both the chocolate and vanilla versions. Unfortunately, neither of these puddings ever thickened up properly. They thickened a little, but no one could ever call them pudding. Of course, we ate it anyway. Mmm, chocolate. Waste not want not and all that.


Tonight, I decided to give it a third go. I wanted pudding! I made it just like the first time. For the vanilla version, I scraped out a vanilla bean and added the bean and insides after I added the milk. At the end I pulled out the bean. Both versions are currently chilling, and I've got my fingers crossed.


Silky Chocolate Pudding
Adapted from John Scharffenberger, via Wednesday Chef, via Smitten Kitchen


Serves 6


1/4 cup cornstarch
1/2 cup sugar
1/8 teaspoon salt
3 cups whole milk
6 ounces 62% semisweet chocolate, coarsely chopped (I use whatever I have on hand)
1 teaspoon pure vanilla extract


1. Combine the cornstarch, sugar and salt in the top of a double boiler. Slowly whisk in the milk, scraping the bottom and sides with a heatproof spatula to incorporate the dry ingredients. Place over gently simmering water and stir occasionally, scraping the bottom and sides. Use a whisk as necessary should lumps begin to form. After 15 to 20 minutes, when the mixture begins to thicken and coats the back of the spoon, add the chocolate. Continue stirring for about 2 to 4 minutes, or until the pudding is smooth and thickened. Remove from the heat and stir in the vanilla.


2. Strain through a fine-mesh strainer (or not, if you don't mind lumps) into a serving bowl or into a large measuring cup with a spout and pour into individual serving dishes. (Or just keep it in its bowl.)


3. If you like pudding skin, pull plastic wrap over the top of the serving dish(es) before refrigerating. If you dislike pudding skin, place plastic wrap on top of the pudding and smooth it gently against the surface before refrigerating. Refrigerate for at least 30 minutes and up to 3 days.


If something goes wrong and the pudding ends up runny, here are some reasons why.


update 3/6/08: My pudding went all soft and gooey. So I stuck it in the freezer and now I have the best bowl of popsicle *ever*. Yum. The vanilla one tastes just like ice cream.

3.04.2008

Olive Bread Rolls from Cyprus


I love these olive bread rolls from macrina bakery, but I can't justify spending .79 on a roll of bread. So, I figured I'd try to make them. I found a basic recipe at "My Mom's Recipes" and changed just a couple of things.


Cyprus Olive Rolls
2 1/2 t dry active yeast
300ml warm water
1t sugar
625g flour (I used all-purpose, you might want to use bread flour or part whole wheat)
2t dry oregano (can also use dry mint, but I didn't)
1 1/2 t sea salt (plus some to sprinkle on top)
3 T extra virgin olive oil (plus some)
175g olives, pitted and sliced (I used some spanish green and some kalamata)
slicing olives yourself takes *forever*-- just buy them sliced if you can

Mix yeast and sugar and warm water in a bowl; let sit somewhere warm for 10 minutes to foam.

Mix flour, herbs, and salt together, then add yeast mixture to make dough. If necessary, add warm water teaspoon by teaspoon (I ended up adding another 4 tsp).

Knead (I used my kitchenaid) for 8-10 minutes, finishing with a few minutes of kneading by hand if you want (I did).

Let rise in lightly oiled bowl in a warm place for one hour, until doubled in size.

Knead again, adding the sliced olives. Separate into eight rounds. Let them rise on the baking sheet (someplace warm!) for 35-60 min until they're puffy again.

Drizzle with oil, sprinkle with salt, bake at 220C (425F) for 20-25 min, until golden. Let cool on
rack.

Devour.

These are best eaten the day they are made, but are good the next day too if you slice and toast them.


when I was little, I didn't like olives. I thought they were little bites of salty ick. As I've gotten older my sweet tooth has faded (I don't like milk chocolate) but I've developed a serious hankering for salt. I like anchovies. And olives.

When I was kneading the olives into this bread, they kept popping out and oozing juice. I just made sure to keep flouring my hands and the table (actually, I work on the top of the dishwasher...) and that kept the dough dry enough. Don't worry if the olives attempt escape. Just work 'em in and you can always poke the outliers into the individual rounds after you separate them.

These bake into soft rolls with a nice shell and they'd be great sliced in half and used for sandwiches. I don't have anything to put in them, but I have no problem eating them as they are. In fact, half of them are gone already. If I made them again, I might make 16 rolls half as big instead of the 8 like this, just to see if they last any longer, but there's a small-foods-illusion that kicks in at a certain point: "Oh, it's so little, I'll just have another...and another..." until the entire tray of minicupcakes is gone any you're wondering why there are so many crumbs under your chair. ...why are you all looking at me?