11.17.2009

dome aux epices

This post is special because it means I've achieved a goal I set for this blog- posting more this year than last year. I know it's been in fits and starts and sporadic posting binges, but I've kept the blog going for two years and I've posted an average of three posts per month (almost one per week!) and that's not terrible. If I keep it going my goal is to schedule the posting binges out so that instead of getting two weeks with a post every day and then two months of silence, you get fourteen weeks of posts once a week.

Anyway, on to the point of this post: the dome. Also called a bombe. I had great fun telling people that I was building bombes at school (they are indeed heavy and delicate and complicated) and then someone told me that perhaps considering my ethnic background, I should choose different words for posting on the internet. No way. I am going to milk my punny joy for all it's worth.


This dessert contained six elements: a chocolate mousse, gingerbread bavarian cream, spice cake (mostly egg whites and almond meal), shiny chocolate icing, gingerbread syrup, and a different spice cake (rye flour, honey) that served as an ingredient in the cream and the syrup.

The spice cakes are made first, and then the syrup, the cream, the mousse. The icing can be made whenever.

First, you pipe chocolate mousse into the molds a little over 1/3 of the way up. You dunk a circular cutout of the spice cake into the spice syrup and place it in the center of the mousse, pressing it in so that it's all level. You want the mold to be about half full when the cake is in.


Then you pipe in the spice bavarian cream, leaving about 1/4"-1/2" of space at the top so that you can press in another layer of dunked spice cake. Once the cake is in and level with the top of the mold, you can go back with more cream and fill in any space in the edges.


Then the dessert needs to be completely frozen. I put it in the blast freezer overnight. When you're ready to unmold, you want your shiny chocolate icing ready. These dessserts are unmolded in a tricky way. I thought I'd flip the mold over, torch the outside, and pop the mold off. No. You take a large bowl of hot water, dunk the mold in (don't get the cake wet!) and then flip the dessert out.

Flip the dessert out. Does that sound easy? This is what it involves: hold the wet mold in one hand. In your other hand, take a cardboard round a bit smaller than the diameter of the mold, and place it over the exposed cake. Press on one side so that the dome slides in the mold, and as it slides, invert your hands so that the mold comes off and the cake ends up upright on the round in your hand. Attempt to put the round down without touching any of the mousse.


Then freeze the tray again so that the slightly-softened mousses can set before you pour slightly-warm chocolate icing over them.

This chocolate icing is gorgeous. It's a deep, shiny black and it looks glittery. It's also a giant pain in the ass and I hate it. It has to cook for ages and it has to be poured at the right temperature, in great volume, quickly. You get one shot to pour it, because it begins to set immediately and any more poured over it won't smooth out. It also never sets entirely, and therefore nothing can touch the dessert at any point after it's been poured- not your spatula, not your fingers, not the sides of sheet trays or racks or doilies. The glaze will stick and peel off in a sheet.


On the plus side, decor sticks really well!


The chocolate mousse used in this dessert might be the best chocolate mousse I've tasted, so even though the recipe is a pain, I am going to give it to you because the texture and flavor are fabulous. It's silky and decadent.

Chocolate Mousse
140g sugar
50g water
120g yolk
100g whole eggs
350g chocolate 65%
500g whipped cream

Whip the yolks and whole eggs in a mixer. Cook the sugar and water to 240F (soft ball). While the mixer is running on high, slowly pour the soft-ball sugar down the side of the bowl into the eggs. Whip on high until cool. The mixture will be light and very fluffy (this is called a pate a bombe base). Melt the chocolate and cool until the whipped cream can be folded in without collapsing. Then fold in the pate a bombe.

11.16.2009

le monte cristo

This was the second cake I worked on, and it involved six separate elements: sacher chocolate cake, pastry cream, butter cream (combined into a mousseline coffee cream), coffee ganache, and trablit syrup.


This recipe also diverged the furthest from the printed version. By way of example, I am going to give you the cake and the mousseline procedures, as written and as performed.

Sacher chocolate cake:
650g marzipan at 50% (use almond paste)
400g icing sugar (use powdered sugar)
320g yolks (note: one yolk is ~15g)
150g butter
150g cocoa
75g flour
75g cornflour (use cornstarch)
480g egg whites
70g sugar

Recipe as printed:
In an electric mixer, whip the marzipan with the icing sugar. Add the yolks and the whole eggs gradually, beating until smooth. Whisk the eggs whites and and sugar to a firm snow, then fold a part of this into the marzipan mixture, then the melted butter, and the sifted mixture of flour, cornflour, cocoa, and finally the remainder of the egg whites. Spread out onto 60cm x 40cm silpat sheets at the rate of 650g/tray.

Recipe as performed:
Using the paddle, beat the almond paste at high speed until smooth. Lower speed and add the yolks one by one, beating until incorporated before adding the next. Change to the whisk attachment. Beat the whole eggs and sugar into the yolk-almond paste until uniform. While this is happening, use another mixer to beat the egg whites and sugar to firm peaks. By hand, fold this into the egg-almond-sugar mixture. Then fold in all the remaining sifted dry ingredients. Then fold in all the butter. Spread onto one silpat-lined sheet tray.

Mousseline coffee cream:
700g pastry cream
1200g buttercream
60g trablit (coffee essence)

Recipe as printed:
In the beater, with a whisk, flavor the pastry cream with the trablit, then, in second gear, incorporate the butter cream bit by bit.

Recipe as performed:
Whip the pastry cream by hand. Whip the trablit and buttercream by hand. Fold buttercream and pastry cream together, VERY CAREFULLY, by hand. Work the mixture as little as humanly possible.

(Chef's comment: "If you put this in the mixer, at all, I guarantee that it will break.")

Even the pastry cream and buttercream procedures as written do not mention tempering the egg yolks (they say "pour scalded milk over the creamed yolks and sugar") and so basically ask you to scramble your eggs.

Lesson: careful with recipes.


The cake turned out well, with two layers of chocolate-almond cake, a layer of the coffee mousseline, and a thick layer of coffee chocolate ganache. The sheet cake had to be skinned and leveled by hand, which was a terrifying procedure, but in the end my layers looked better than I'd expected they would. The whole cake was auctioned off for charity and the small slices were sold in the pastry case.

11.15.2009

cake and tart rotation

All I did was cakes. Two weeks, three cakes, and more creme anglaise than I ever thought I'd make.

This rotation taught me a lot about recipes. Namely, that one should never follow them. They are provided as a ruse to trick the eager and unsuspecting student. The chef is waiting for you to come to him to ask about technique, at which point he will inform you that what is written on that paper in your hand will only yield disaster.

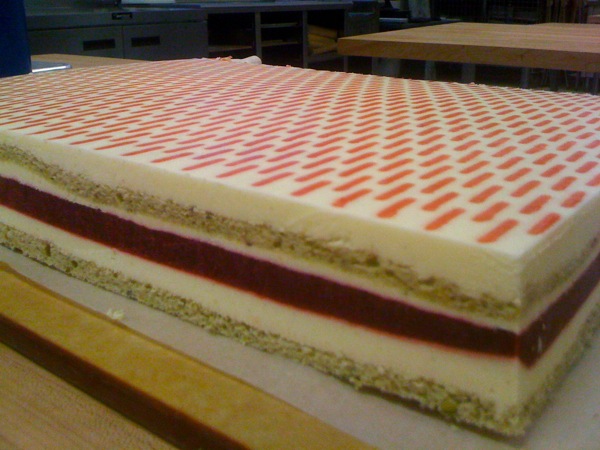
The first cake is the emeraude pistache framboise. It is a layer cake composed of a pistachio sponge cake, a vanilla bavarian, and a raspberry gelee. This cake is mostly an exercise in getting layers spread across a sheet pan to be of an even depth, and that's harder than you'd think. I don't know why someone doesn't invent a cake collar with a grid. Or one that's transparent.

As you can see, this part of the cake looks great. Nice, even layers. Until you get to that bit on the left there. Oops.


The cake was made and assembled over two days, frozen overnight, and then cut and sold on the third day.


I ended up with sixteen small pieces and two medium cakes. The slices are cut with a long double-handled knife, and we heat the blade with a blow torch between slices. Since the cake is frozen, this makes slicing through it very easy. It's like a hot cake guillotine.

11.14.2009

breaking down a bunny

Warning: this post is full of bunny bits and meaty photos. If you're just here for the sweets and are squicked out by dissection, you may want to skip what follows.

On the day I was to deconstruct the rabbit, it took a very long time to thaw. My fellow students had told me that it took them roughly two hours (!) to complete the project, but by the time I could start, I only had an hour and a half until the end of class, including the half-hour designated for cleanup. And I had to get to work. This did not bode well. But eventually, we began.

This is a bunny, straight out of the bag- it's got its hind legs tucked into its stomach cavity, which leaves it looking sort of like a fetus. This, predictably, bothered some people.


First, you take the hind legs out and remove the organs from the bunny. There will be heart, kidney, and liver. Because bunnies are classed as poultry in this country for processing, the organs are removed and then replaced during butchery, and the organs you get may not have belonged to the actual bunny in hand. Mine had three hearts, and the bunny of the student next to me had none.

The first cut (after removing the kidney, which is left attached, and residual fat) is to remove the sides of the stomach area; there would be hangar steak and skirt steak here if this were a cow.


in this closeup you can see that the tenderloins- removing these is the next step. You must be careful, as they are small and fragile.


Once the tenderloins are taken care of (they're stacked together just above the bunny in the photo below) the hindquarters are removed, cutting up around the hip joint.

the legs are then deboned, leaving in the shinbone if desired. this is done by cutting around and along the bones on the seam visible there, starting with the wide end, scraping along the bone as you go.


After the hindquarters, the shoulders are removed completely (move the arm around to locate the edges of the scapulae) and deboned entirely. If there is an elegant way to do this, I'm not aware of it. I ended up with a messy pile of shoulder meat (I spared you that photo).


This is the point at which I ran out of time. The next cut is between the short ribs (top) and the long ribs (bottom). You cut toward the neck area until the short ribs are removed and the lower/back ribcage exposed.

The ribcage is separated from the lower spine by cutting where the ribcage meets the lower spine, and the top at the neck area is cut as well. Basically, cut away the spine that is not attached to the ribs.

The long ribs are trimmed to a reasonable length on each side, and then the ribs are cut from the spine to leave you with two little racks of rabbit. The ribs on these racks can then be frenched by cutting between the ribs and sliding the meat down to expose about 1/4"-1/2" of rib.


Bones can be used for stock. Meat yield in this project was around 70%.

11.13.2009

doughs, week two

remember those failed brioche? my poor sad brioche-sans-tetes were reincarnated as something much more delicious today:

these are the brioche, hollowed out, and stuffed with leeks and mushrooms cooked in white wine and cream. the whole thing is topped with comte cheese and finished in the oven until the cheese bubbles and browns. they were SO GOOD.


this is a kugelhopf. it's a brioche-like dough, filled with (in this case) ham, comte cheese, and onion. I wanted to eat it so bad.


whole wheat croissants- i'm not a big fan of these (whole wheat? why not use nonfat butter too? just suck all the fun right out.) but people who like whole wheat said they were tasty.


this is a pithivier; it's puff pastry (in this case, italian- contains honey and white wine) filled with whatever you like. mine contain ham, apples, blue cheese and walnuts. i called it a waldorf pithivier. in the oven they went from 1/4-1/2" thick to almost two inches. Magic!


And that's it for the dough rotation- croissants (regular and whole wheat, both with pre-ferments), brioche, puff pastry, and kugelhopfs. Lots of savory items, which are (shh, don't tell) my favorite. Next rotation is culinary.

11.12.2009

back in school

So I went back to school and immediately stopped posting. I apologize. Two jobs, a new internship, classes... *bitchwhinepissmoan*. Woe is me. But, I do have pictures and other things to share, and I'm going to start now before I get hopelessly behind and give up entirely.

These pictures are from the first week of my first rotation, which was doughs.

brioche a tetes- fail. misshapen and lost their heads.


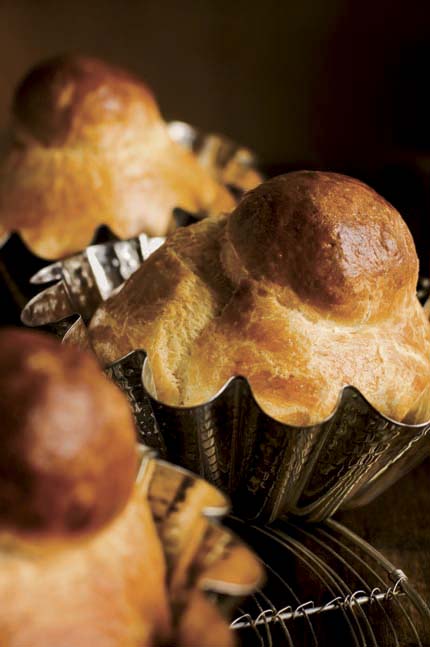
they are supposed to look like this:


and these are pain au raisin, brioche rolled with vanilla pastry cream and rum-soaked currants, finished with an apricot glaze:


and finally, almond croissants- twice baked, soaked in rum simple syrup, filled with frangipane (almond paste), coated in almonds and powdered sugar: