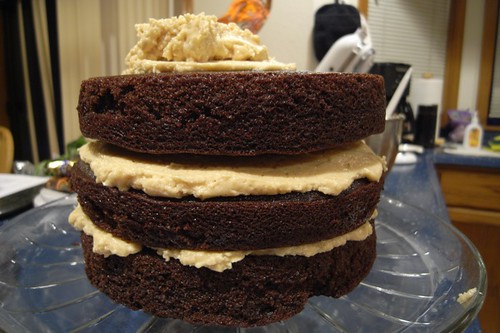
This is the biggest (tallest) cake I've ever made. The Tiramisu cake might have come close, now that I think of it, but trust me: this cake is massive. It's also extremely rich. And extremely delicious.

The cakes are not too sweet, but they are very, very soft. The cream cheese/peanut butter frosting/filling is rich and tastes, essentially, like reese's peanut butter cups.
And as if that weren't enough, you dump peanut-dark chocolate ganache over the whole thing. Seriously, we're gilding the lily here. Gild away.
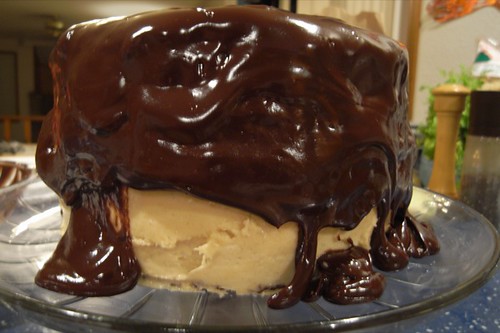
I didn't say it was pretty, but once you have your fork in your mouth you won't care. I promise.
Recipe taken from Smitten Kitchen
Sour Cream-Chocolate Cake with Peanut Butter Frosting and Chocolate-Peanut Butter Glaze
Sky High: Irresistable Triple-Layer Cakes
This cake is INTENSE. Serve it in the thinnest slices possible, and keep a glass of milk handy.
Makes an 8-inch triple-layer cake; serves 12 to 16 (the book says, I say a heck of a lot more)
2 cups all-purpose flour
2 1/2 cups sugar
3/4 cup unsweetened cocoa powder, preferably Dutch process
2 teaspoons baking soda
1 teaspoon salt
1 cup neutral vegetable oil, such as canola, soybean or vegetable blend
1 cup sour cream
1 1/2 cups water
2 tablespoons distilled white vinegar
1 teaspoon vanilla extract
2 eggs
1/2 cup coarsely chopped peanut brittle (I skipped this)
1. Preheat the oven to 350 degrees F. Butter the bottoms and sides of three 8-inch round cakepans. Line the bottom of each pan with a round of parchment or waxed paper and butter the paper.
2. Sift the flour, sugar, cocoa powder, baking soda, and salt into a large bowl. Whisk to combine them well. Add the oil and sour cream and whisk to blend. Gradually beat in the water. Blend in the vinegar and vanilla. Whisk in the eggs and beat until well blended. Scrape down the sides of the bowl and be sure the batter is well mixed. Divide among the 3 prepared cake pans.
3. Bake for 30 to 35 minutes, or until a cake tester or wooden toothpick inserted in the center comes out almost clean. Let cool in the pans for about 20 minutes. Invert onto wire racks, carefully peel off the paper liners, and let cool completely. (Deb note: These cakes are very, very soft. I found them a lot easier to work with after firming them up in the freezer for 30 minutes. They’ll defrost quickly once assembled. You’ll be glad you did this, trust me.)
4. To frost the cake, place one layer, flat side up, on a cake stand or large serving plate. Spread 2/3 cup cup of the Peanut Butter Frosting evenly over the top. Repeat with the next layer. Place the last layer on top and frost the top and sides of the cake with the remaining frosting. (Deb note 1: Making a crumb coat of frosting–a thin layer that binds the dark crumbs to the cake so they don’t show up in the final outer frosting layer–is a great idea for this cake, or any with a dark cake and lighter-colored frosting. Once you “mask” your cake, let it chill for 15 to 30 minutes until firm, then use the remainder of the frosting to create a smooth final coating. Deb note 2: Once the cake is fully frosting, it helps to chill it again and let it firm up. The cooler and more set the peanut butter frosting is, the better drip effect you’ll get from the Chocolate-Peanut Butter Glaze.)
5. To decorate with the Chocolate–Peanut Butter Glaze, put the cake plate on a large baking sheet to catch any drips. Simply pour the glaze over the top of the cake, and using an offset spatula, spread it evenly over the top just to the edges so that it runs down the sides of the cake in long drips. Refrigerate, uncovered, for at least 30 minutes to allow the glaze and frosting to set completely. Remove about 1 hour before serving. Decorate the top with chopped peanut brittle.
Peanut Butter Frosting
Makes about 5 cups
10 ounces cream cheese, at room temperature
1 stick (4 ounces) unsalted butter, at room temperature
5 cups confectioners’ sugar, sifted
2/3 cup smooth peanut butter, preferably a commercial brand (because oil doesn’t separate out)
1. In a large bowl with an electric mixer, beat the cream cheese and butter until light and fluffy. Gradually add the confectioners’ sugar 1 cup at a time, mixing thoroughly after each addition and scraping down the sides of the bowl often. Continue to beat on medium speed until light and fluffy, 3 to 4 minutes.
2. Add the peanut butter and beat until thoroughly blended.
Chocolate-Peanut Butter Glaze
Makes about 1 1/2 cups
8 ounces seimsweet chocolate, coarsely chopped
3 tablespoons smooth peanut butter
2 tablespoons light corn syrup
1/2 cup half-and-half
1. In the top of d double boiler or in a bowl set over simmering water, combine the chocolate, peanut butter, and corn syrup. Cook, whisking often, until the chocolate is melted and the mixture is smooth.
2. Remove from the heat and whisk in the half-and-half, beating until smooth. Use while still warm.