5.27.2008

pizza bianca

You might complain that this is called a pizza and yet there are no toppings. No cheese, no sauce, no cured meats or roasted vegetables. All I can say in my defense that I didn't name the thing, I just made and devoured it. And really, I don't care what you call it as long as you make it right away. Pizza or not, it's simply wonderful.

pizza bianca, finished

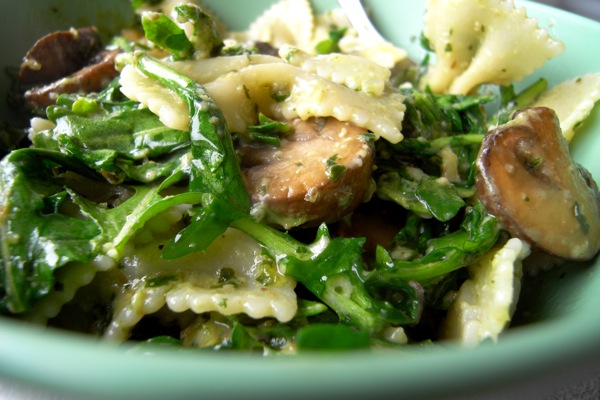
This recipe requires instant yeast and I thought that meant it would be a faster process, but it still rises twice. The flavor is strong and complex on account of this and it's well worth the time. Breads seem tricky but I'm realizing that they take time and patience (things I tend to lack) but they're not actually that difficult, and they are so rewarding-- it's amazing to take a handful of simple ingredients and magically transform them into something with so much flavor.

pizza bianca, dough prepped for the oven

I will note that this bread (like most homemade breads) doesn't keep well, and the recipe makes far too much for one person, so I would recommend that you halve the recipe or share. It's so good that you may think you will eat the whole batch yourself, but I tried valiantly and failed. I wonder if it would make good breadcrumbs for another project?

pizza bianca, sliced

Jim Lahey’s Pizza Bianca
From Smitten Kitchen

Makes two long pizzas

3 cups all-purpose flour
1 teaspoon salt
3/4 teaspoon sugar
1 teaspoon instant dry yeast
3 tablespoons extra-virgin olive oil
1 sprig fresh rosemary

1. Combine flour, 1/2 teaspoon salt, sugar, and yeast in the bowl of an electric mixer, and slowly add 1 cup cold water. Mix on low speed until ingredients begin to combine, increase speed to medium-high, and continue to mix for about 10 minutes until the dough is smooth, elastic, and cleanly pulls away from the sides of the mixing bowl. I used the paddle attachment on a kitchenaid until the dough came together and then I switched to the dough hook.

2. Place dough in an oiled bowl, and allow to rest for 2 to 4 hours until it has doubled in size. Split the dough into halves, and form each into a log [or in my case, realize that I forgot to do this, and roll it out instead!]. Place each log on a generously floured surface, and allow it to rest until the formed dough doubles in size again, at least 1 hour.

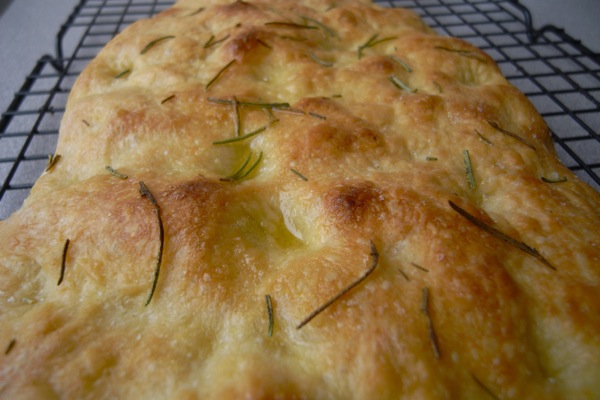
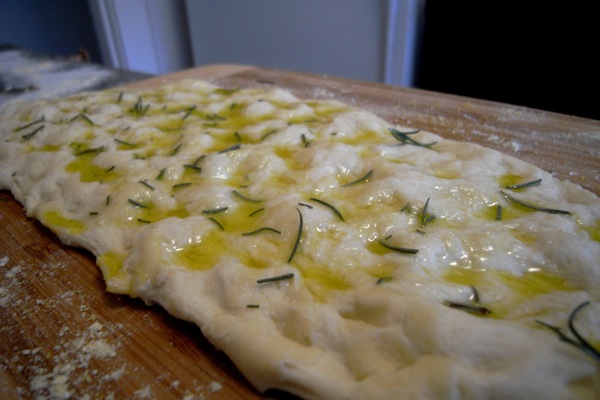
3. Put dough on a lightly floured baker’s peel, or something flat covered in cormeal. You'll have to slide the dough off, so don't use anything with a lip or raised edge. Dimple dough by pressing it down with your fingertips. Work the dough outward toward the edges of the peel until you reach your desired size and thickness, about 1/4 inch. Drizzle with remaining olive oil, rosemary and sprinkle with remaining salt.

4. Place a baking stone, sometimes known as a pizza stone, in the oven. Set oven to broil, about 520 degrees. Slide pizza onto baking stone. Bake until the bubbles range from golden to deep brown in color, 10 to 12 minutes. If you don't have a stone baking it on a baking sheet is fine.

mexican chocolate cake

I've had two recipes done and photographed and I haven't yet had time to actually write them up and post them. I'm moving into a new apartment on Thursday, and next week is the last week of classes, which means that this is crunch time at school as well. While that doesn't quite explain why I haven't yet written up recipes that I made two weeks ago... it's my story and I'm sticking to it.

So, belatedly, I offer you chocolate AND cake. Hopefully this will make up for the delay.

mexican chocolate cake
The cake is crosshatched because I let it cool upside down. Oops.

This isn't the cake I wanted to make. I went to the Pike's Place market one weekend and ate a piece of mexican chocolate cheesecake and knew immediately that I must make one. After an hour on the internet, however, I still lacked an appropriate recipe. I didn't want to improvise or experiment with expensive cheesecake ingredients, so I figured I would start smaller. (I may, in the end, go back to the cheesecake place and ask them how it's done.) I could have waited until finding an appropriate recipe but by this point I had a serious hankering for chocolate, cinnamon and cayenne cake in whatever form I could concoct.

I found several mexican chocolate cake recipes, and I chose this one because it also had a mexican chocolate sauce. I sure do like chocolate sauce. Additionally, I worried (rightly so, as it turned out) about the level of spice flavor in the cake, and I knew this could be compensated for by adjusting flavors in the sauce. As it turns out, the cinnamon and cayenne pepper flavors in the cake were much weaker than I would have liked (although other people claimed they were well pronounced- I should point out that I like spicy things and tend to spice high). I made the sauce much more spicy and the cake and sauce complemented each other very well in the end, and provided options for people with varying spice tolerances. Another great benefit of this recipe is that it's easily made with things I have on hand-- a recipe that doesn't require a trip to the store is truly a wonderful thing (especially considering that I tend to make things with expensive ingredients and ultimately, I am a pauper. I need more recipes like this.)

As a note, the cake is vegan, but the way I made the sauce is not.

I would like to make this again in cupcake form and turn the sauce into a frosting.

Mexican Chocolate Cake
Slightly adapted from Dozen Flours

1 1/2 cups flour, sifted (I used cake flour instead of all purpose. If you decide to use cake flour, add an additional 4 tablespoons of flour to the recipe.)
1 cup sugar
4 tablespoon cocoa powder
1 teaspoon baking soda
1 teaspoon cinnamon
1/4 to 1/2 teaspoon cayenne pepper (1/2 will be very spicy!)
1 teaspoon. vanilla extract
1 tablespoon distilled white vinegar
5 tablespoons vegetable oil
1 cup cold water

Preheat the oven to 350°F. Lightly grease a 8 to 9-inch cake pan or spring form pan.

In a medium bowl, sift together the flour, sugar, cocoa powder, and baking soda. Stir in the cinnamon, cayenne, vanilla, vinegar, oil, and water. Mix until just combined.

Pour into the prepared cake pan and cook for 30 to 35 minutes, or until a knife inserted into the center comes out clean. Let cool.

Chocolate Sauce

2 ounces dark chocolate
1/4 cup water or soy milk (I used whole milk)
1/2 cup sugar
3 tablespoons vegan margarine (I used butter)
1/2 tespoons vanilla
1 to 2 pinches cayenne pepper

Melt dark chocolate with water or milk in a saucepan over low heat. Stir constantly until the chocolate is melted. Stir in sugar and cook, stirring constantly, for about 5 minutes. Remove from the heat and stir in margarine, vanilla, and cayenne pepper, to taste. The sauce is drippy rather than thick and should be poured over individual slices.

5.16.2008

pasta with walnut pesto and arugula

After leaving you with such sad photos for the last two recipes, I resolved to make up for it with this one.

Basil is finally reappearing in the stores, and what better way to make use of it than pesto? This pesto is delicious, and I'd make it again on its own to eat with bread. The bright green color of the arugula and pesto in the pasta makes me feel like spring is really almost here.

pasta with walnut pesto and arugula

I thought making pesto would be hard, but really all you do is put a bunch of things into a blender and press a button. It's impossible to over-blend, so you can mix and taste and add and mix and taste.

walnut pesto

Once you've got the pesto finished, you cook some mushrooms (I used crimini, but any will do) in butter (I couldn't resist, but olive oil is fine too). The recipe says to use as garnish, but I really liked the earthiness the mushrooms added to the overall flavor, so I made a bunch so that they were a more substantial part of the dish. The mushrooms may take a while to cook, so start them at the same time you set the water on the stove to boil.

mushrooms

Make sure to get the walnuts nice and toasted, or they'll taste a little bitter.

walnuts

The only bitterness you want is from the arugula (or whatever bitter green you chose); the bite of the arugula is a nice contrast to the mushrooms and pesto and it keeps the pasta from feeling or tasting heavy. Trader Joe's has arugula for a really reasonable price.

arugula

Sometimes, I make important notes on my recipes:

recipe

Pasta with Walnut Pesto and Arugula
From Food and Wine

Ingredients

1 cup walnut halves (4 ounces)
2 cups lightly packed basil leaves
1 large garlic clove, thinly sliced
1/4 cup extra-virgin olive oil
3/4 cup freshly grated Parmigiano- Reggiano cheese
Salt and freshly ground pepper
1 pound pasta-- something in small pieces, not long noodles
6 ounces watercress, arugula or other bitter greens, thick stems discarded and leaves coarsely chopped
Sautéed mushrooms, for serving


Directions

1. Preheat the oven to 350°. Bring a large pot of salted water to a boil. Spread the walnuts on a baking sheet and toast for 8 to 10 minutes, until they are fragrant and lightly browned. Let cool completely. Coarsely chop half of the walnuts and set the remaining toasted walnuts aside.
2. In a food processor, pulse the remaining walnuts with the basil and garlic until the walnuts are finely chopped. With the machine on, add the olive oil in a thin stream and process until the pesto is almost smooth. Add 1/2 cup of the cheese and pulse until just incorporated. Transfer the walnut pesto to a bowl and season it with salt and pepper.
3. Add the broken lasagna noodles to the boiling water and cook until al dente. Drain the pasta, reserving 1/2 cup of the pasta cooking water. Return the drained pasta to the pot. Add the watercress and walnut pesto and toss well. Add the reserved pasta water and toss again until well coated. Transfer the pasta to bowls, garnish with the remaining 1/4 cup of cheese, the chopped walnuts and sautéed mushrooms and serve.

5.14.2008

pumpkin bread pudding

I know this is the wrong season: technically it's spring, not fall. But in Seattle, it rains from November through May, so I figure my eating doesn't have to follow seasonal variation I don't actually get to experience.

I know, this dish isn't pretty either. Bread pudding is rarely, if ever, pretty. It doesn't even sound good, and for years the name itself put me off: what kind of sicko puts bread in pudding? Since my discovery of the tastiness that is bread pudding, I've seen recipes for bread soup. Bread salads, I actually kind of understand (I was always a lover of croutons), but soup? Really? Really.

pumpkin bread pudding

This bread pudding is like pumpkin pie meets bread pudding, basically, with a healthy gut-warming splash of bourbon. If that's not enough to make you try it, I don't know what is. Oh, well, it's really easy, too-- one bowl, one baking dish, one spoon. I prefer it to pumpkin pie now because there's no crust to mess with and I still get all my favorite flavors without the fear of failure that crust-making always inspires. Feel free to up the spices if you like; I usually double them.

pumpkin bread pudding

Pumpkin Bread Pudding
Adapted from Gourmet Magazine, October 2007
Adapted again by Smitten Kitchen


1 1/2 cups whole milk
3/4 cup canned solid-pack pumpkin
1/2 cup sugar
2 large eggs plus 1 yolk
1/2 teaspoon salt
1 teaspoon ground cinnamon
1/2 teaspoon ground ginger
1/8 teaspoon ground allspice
Pinch of ground cloves
2+ tablespoons bourbon (optional)
5 cups cubed (1-inch) day-old baguette or crusty bread
3/4 stick unsalted butter

Preheat oven to 350°F with rack in middle.

While preheating oven to 350°F with rack in middle, melt butter in bottom of a 8-inch square baking dish. Once it is melted, take it out of the oven and toss bread cubes with butter, coating thoroughly.

In a separate bowl, whisk together all the remaining ingredients. Pour them over buttered bread cubes in baking dish, stirring to make sure all pieces are evenly coated. Bake until custard is set, 25 to 30 minutes. Eat warm.

5.13.2008

flourless chocolate cupcakes

Okay, I admit it: I've been delinquent here. I haven't posted in ages, and now I'm going to give you a picture of some very sad-looking cupcakes. But they taught me a lesson, I promise.

flourless chocolate cupcakes, overbaked


I've been learning, over the course of baking with my oven, that I need to shave a couple of minutes off whatever the suggested cooking time for something is-- despite the fact that my oven thermometer tells me that my oven is at the correct temperature. Clearly the thermometer and the oven are in cahoots and they've decided that I simply do not need any more chocolate.

My new favorite adjective in baking is "flourless," despite the trouble with the last cake and these cupcakes too. The reason is that when you get these things right, they're phenomenal. I made these cupcakes again, three times. You know, to make sure I had the cooking time right. And because I'd eat them so fast it felt there surely couldn't have been a dozen on the tray five minutes ago. My evidence that they're so good? Even though I made them three times beyond that pathetic photo above, I never had the presence of mind to take another picture.

Here's the trick: Check them at six minutes. If you want a molten center, pull them out while the middles are still very shiny and carefully ease them out of the pan after they've cooled for about ten minutes and eat them right then. They will ooze deliciousness all over you. Once the six-minute cupcakes have cooled entirely, the middles will solidify into a slightly fudgy deliciously moist mass.
At seven minutes, the centers of the warm cupcakes will be solid. At eight minutes, they're overdone, but still entirely edible.

Use good chocolate if you have it. It's not entirely necessary, but it's worth it.

You can also make a salted toffee sauce for these, with or without hazelnuts. I made it without hazelnuts and the first time it was too salty, and the second time, i lessened the salt and it was too sweet. I guess I just don't like this toffee. I thought the cupcakes were perfect on their own, but feel free to adorn them if you feel compelled to gild the lily.

Flourless Chocolate Cupcakes
from The Bizarre Kitchen Incident. She got them from, surprisingly, Nestle.
makes 12 cupcakes

3/4 cup unsalted butter
8oz Nestle Chocolatier bittersweet chocolate (either morsels, or chopped bar form)
3 large eggs
3 large egg yolks
1/4 cup plus 1 T sugar
1 t vanilla extract
1 T AP flour

Preheat oven to 425*. Grease a muffin tin liberally with Crisco.

Place eggs, egg yolks, sugar and vanilla in the bowl of a stand mixer or in a large mixing bowl. Beat on medium-high speed with the whisk attachment until fluffy and light yellow, about 8 minutes. The mixture will drizzle into the bowl in a slowly-dissolving ribbon when it's been mixed enough.

While the eggs are being mixed: In a large, heavy saucepan, melt the butter over low heat. Add the chocolate and stir constantly, until chocolate is melted and the mixture is smooth. Remove from heat.

Switch to the paddle attachment (or, if not using a stand mixer, a sturdy spatula).
Slowly add 1/3 of the chocolate to the egg mixture, stirring slowly. Once the chocolate is incorporated, add the rest of the chocolate and the flour. Mix on low speed until a somewhat thin batter is formed.

Divide the batter among 12 muffin cups.
Bake for 10-12 minutes, or until set around the edges and slightly jiggly in the center. Place pan on a wire rack to cool for 10 minutes.
Gently run a knife around the edge of each muffin and turn out onto a rack to cool for about 5 minutes.

Salted Toffee Hazelnut Sauce

1/2 cup firmly packed brown sugar
1/2 cup light corn syrup
1/4 cup unsalted butter
1/2 cup chopped toasted hazelnuts
1 t vanilla
1 t kosher salt

Place all ingredients in a heavy saucepan. Over medium heat, stir until the butter and sugar melt.


Continue stirring occasionally until the mixture comes to a full boil - 5-7 minutes. Once it reaches a boil, let it boil without stirring for 1 minute.

Remove sauce from the heat and let cool about 10 minutes.

Spoon over cupcakes.